
How to Judge Weld Quality on a Trailer
How to judge weld quality on a trailer: spot undercut, porosity, cold lap, and cracks, find the welds that matter most, and know what to ask the builder.
By Strank Trailers15 min read
The short version
- A good weld has a consistent width and ripple, blends smoothly into both pieces of steel, has filled ends, and shows no cracks, pinholes, or rolled-over edges.
- No federal standard governs weld quality on trailers, so how well a trailer is welded depends entirely on the builder.
- AWS D1.1, the structural welding code for steel, is a useful yardstick: no cracks, complete fusion, filled craters, and undercut no deeper than 1/32 in on steel under 1 in thick.
- The welds that matter most on a dump trailer are at the tongue-to-frame junction, crossmember-to-rail joints, rear hinge, hoist mounts, and spring hangers.
- Neither robot nor hand welding is automatically better. Consistent fit-up, the right procedure, and qualified welders are what count.
On this page
- Why weld quality matters so much on a dump trailer
- What a good weld looks like
- Common weld defects and what they mean
- Continuous vs. stitch welds
- Where welds matter most on a dump trailer
- MIG vs. flux core (and why the welder matters more)
- AWS D1.1, certified welders, and what to ask
- Robotic vs. hand welds
- How to inspect welds at the dealer lot
- The bottom line
You can judge most of a trailer's weld quality by eye. A good weld has a consistent width and ripple pattern, blends smoothly into both pieces of steel with no groove along its edges, has filled-in ends, and shows no cracks, pinholes, or edges rolled over on top of the steel. Checking for those takes a few minutes on a dealer lot, with a flashlight and some patience.
Welds hold a trailer together. On a dump trailer, which takes a hard pounding every time it's loaded, driven, and dumped, they decide whether the trailer lasts five years or twenty-five. This guide covers what good and bad welds look like, where to look on a dump trailer, and what to ask the builder.
Why weld quality matters so much on a dump trailer
A dump trailer isn't loaded once and left alone. Every bucket drop, pothole, and dump cycle flexes the frame a little. Engineers call this cyclic loading, and it causes fatigue: small cracks that start at a weak point and grow a bit with every cycle until something breaks.
In a welded frame, fatigue cracks usually start at welds, most often at the toe (the edge where the weld meets the base steel) or at a start or stop. Anything that concentrates stress there, like a groove, a pinhole, a sharp transition, or an unfused edge, makes the crack start sooner. A weld that looks fine on day one can fail after a few thousand loads if it has those defects.
No one regulates trailer welds
Federal trailer standards cover lighting, tires, certification labels, and similar items. They don't set weld quality. The National Association of Trailer Manufacturers (NATM) runs a compliance verification program for its members, but it focuses on federal requirements like lighting, brakes, axles, capacity, and labeling, not on welding codes.
So how well a trailer is welded is entirely up to the builder: their procedures, their training, their inspection, and how much time they give each weld. That's why it pays to know what to look for.
What a good weld looks like
Most trailer welds are fillet welds, the triangular bead that joins two pieces meeting at an angle, like a crossmember sitting against a main rail. A good one has these traits:
- Consistent width and height along its whole length. No sudden fat or skinny spots.
- Even, regular ripples. The ripple pattern shows the welder's travel speed and rhythm. Uneven ripples mean uneven heat and filler.
- Smooth toes. The edges should blend into both pieces of steel with no groove and no sharp lip.
- Flat to slightly convex face. Not a tall, ropy bead sitting on top of the joint, and not a deeply sunken one.
- Filled ends. Craters (the dimple left when the arc stops) should be filled in.
- The right size. A common shop rule of thumb is a fillet leg about equal to the thickness of the thinner piece. Engineers size critical welds by calculation, but a skinny bead on a heavy joint is a red flag.
- Clean. Little spatter, and no slag left on flux-cored welds.
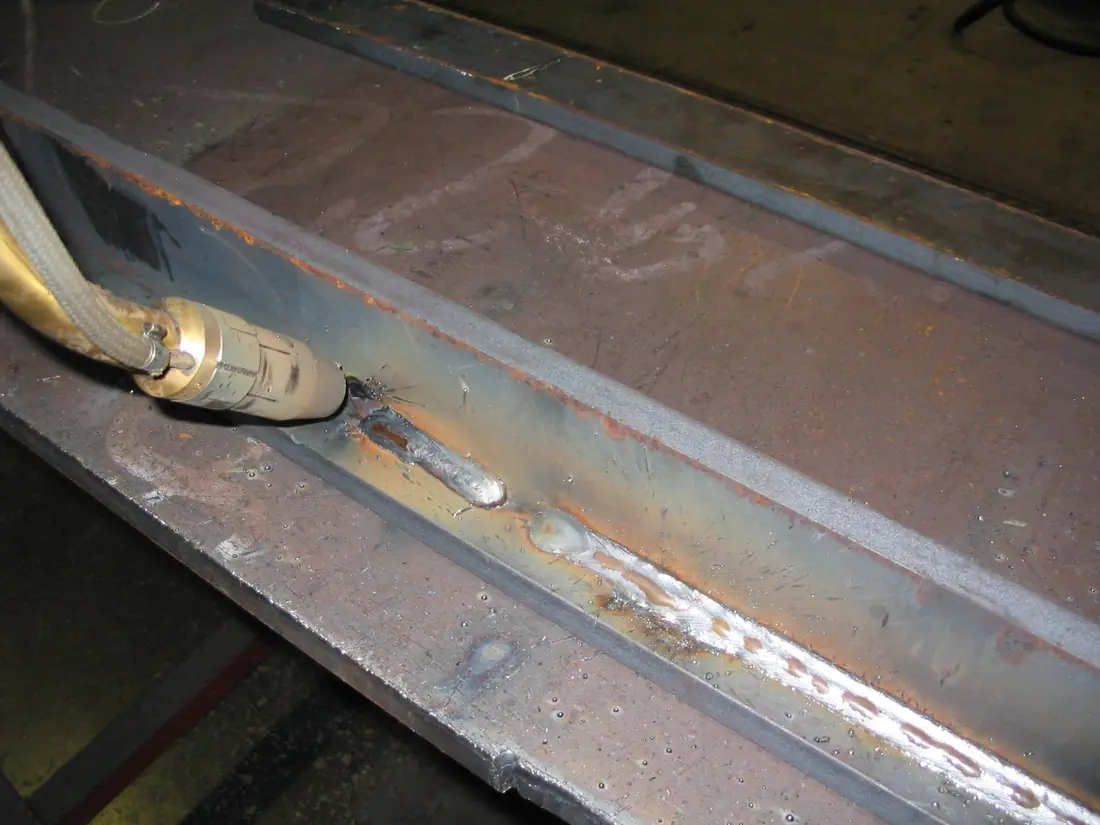

Common weld defects and what they mean
| Defect | What you see | Why it matters |
|---|---|---|
| Crack | A line in the weld or along its edge | Grows with every load; always unacceptable |
| Undercut | A groove melted into the steel along the weld's edge | Thins the steel and concentrates stress where fatigue starts |
| Porosity | Pinholes or bubbles in the weld face | Trapped gas; surface pores often mean more inside |
| Cold lap (lack of fusion) | Bead sits on top with rolled, overlapping edges | The weld isn't fused to the steel and can let go |
| Unfilled crater | A dimple at the end of a weld | A common place for cracks to start |
| Spatter | Small metal beads stuck around the weld | Mostly cosmetic; signals poor settings or dirty steel |
| Burn-through | Holes melted through thin sheet | Weakens the panel and lets water in |
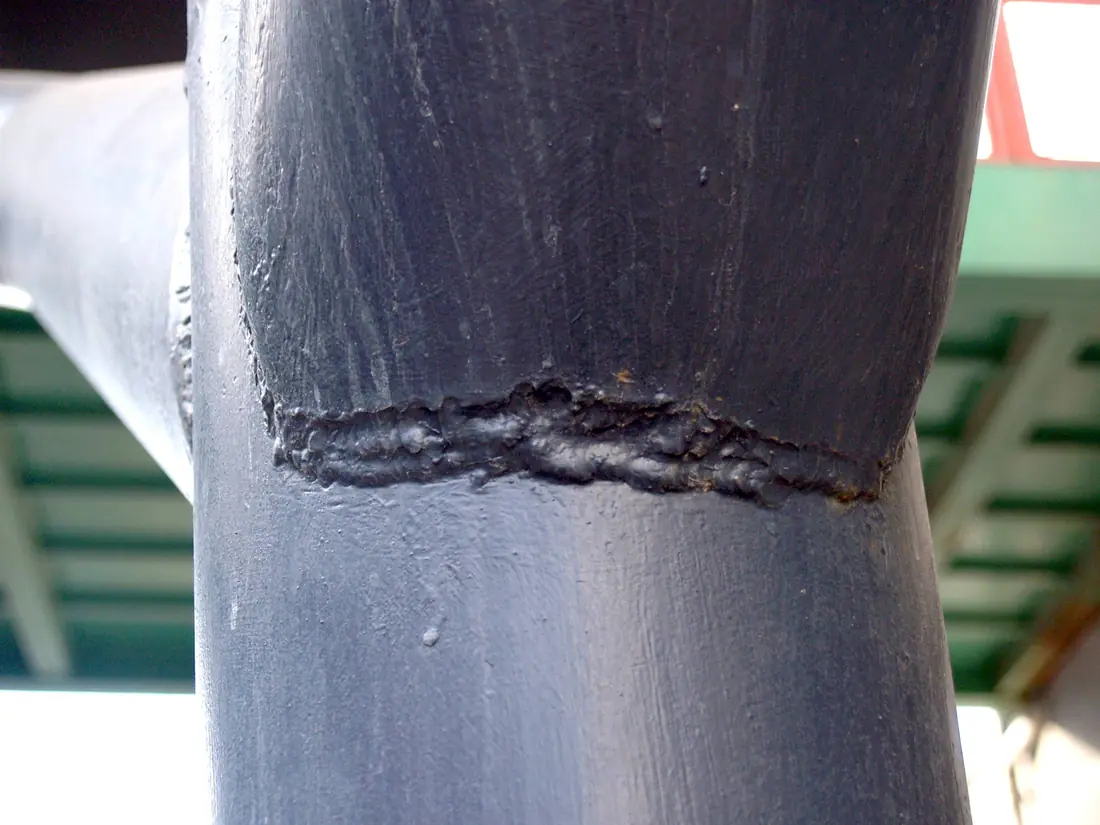

Cracks
Any crack is a reject. AWS D1.1, the structural welding code for steel, says plainly that any crack is unacceptable regardless of size or location. Look closely at the ends of welds and along the toes. On a painted trailer, a crack often shows up as a hairline split in the coating or a thin rust streak running from the weld.
Undercut
Undercut is a groove melted into the base steel along the edge of the weld that the filler metal didn't fill back in. It usually comes from too much heat, too fast a travel speed, or the wrong gun angle. It thins the steel right where stress concentrates, so it's a classic starting point for fatigue cracks.
For statically loaded structures, AWS D1.1 limits undercut to 1/32 in deep on steel less than 1 in thick, with limited exceptions. For cyclically loaded structures like bridges, the limits on primary members are tighter. You don't need a gauge on the lot. If you can see a distinct groove or catch a fingernail in it, it's worth asking about.
Porosity
Porosity is gas trapped in the weld as it cools, from poor shielding gas coverage, wind blowing the gas away, or oily, rusty, or wet steel. It shows up as pinholes or small craters in the bead. Surface pores often mean there are more inside.
AWS D1.1 caps visible piping porosity on statically loaded fillet welds at a combined 3/8 in of pore diameters in any inch of weld, and allows none in certain full-penetration groove welds. Beyond strength, pores trap moisture and are hard to coat, so they rust early.
Cold lap (lack of fusion)
Cold lap is the defect that fools people most, because the weld can look neat. The filler metal flows onto the steel without truly melting into it, so the bead sits on top like a line of toothpaste. Signs include a tall, rounded, ropy bead, edges that roll over the steel instead of blending in, and a sharp line where the bead meets the steel.
It usually comes from too little heat for the thickness of the steel, which makes it a particular risk with low-heat MIG settings on thick frame members. A cold-lapped weld may hold for a while and then let go all at once. D1.1 requires complete fusion between weld and base metal.
Unfilled craters
When a welder stops the arc without filling the end, the weld leaves a dimple. That crater is thin and shrinks as it cools, so crater cracks are common. D1.1 requires craters to be filled to the full weld size, except at the ends of intermittent fillet welds outside their effective length.
Spatter
Spatter is the scatter of small metal beads stuck to the steel around a weld. It's mostly cosmetic, and some is normal. Heavy spatter suggests poor machine settings or dirty steel. It also makes for a lumpy surface under paint or powder coat, which can lead to early coating failure.
Continuous vs. stitch welds
A continuous weld runs the full length of a joint. A stitch weld (also called intermittent or skip welding) is a series of short welds with gaps between them, like 2 in of weld, 4 in of gap, repeated.
Stitch welding has legitimate uses. It puts less heat into thin sheet, so the sheet warps less, and it's faster. Joining a floor sheet to bed crossmembers with stitches can be a reasonable choice.
On structural joints, stitches have real downsides:
- More starts and stops. Every stitch has a start and a stop, and each is a place where defects and fatigue cracks tend to begin.
- Gaps let water in. The space between stitches lets water and road salt into the joint, where it's almost impossible to coat. Rust then builds up inside the joint and can pry the parts apart.
- Less weld carrying the load. Fewer inches of weld means more stress on each inch.
A continuous weld isn't automatically good, though. A continuous bead with undercut or cold lap is still a bad weld. What you want is continuous welds of good quality at structural joints, and a sensible choice of continuous or stitch welding on sheet.
Where welds matter most on a dump trailer
Some welds carry much more load than others. Spend your inspection time here.
| Location | What it carries | What to look for |
|---|---|---|
| Tongue-to-frame junction | Tongue weight, pulling and braking forces, hitch shocks | Full welds both sides, gussets or plates, no cracks |
| Crossmember-to-rail joints | Floor and bed loads into the main rails; frame twist | Welded on all accessible sides, wrapped corners, no cracks at ends |
| Rear hinge mounts | The whole bed and load during a dump | Full welds on hinge plates to both frames, plate around the pin |
| Hoist and cylinder mounts | The full lifting force, concentrated at a few points | Full welds, gussets, reinforcing plates that spread the load |
| Spring hangers | Axle loads, braking, bumps | Welded all the way around, reinforcement at the frame |
| Coupler and jack mounts | Hitch loads, the trailer's weight when parked | Full welds, no distortion around the mount |
On structural joints, "wrapped" welds are a good sign. That means the bead continues around the corner at the end of a member instead of stopping short. Stopping a weld right at a corner leaves a stress point exactly where the joint is loaded hardest.
For more on how the frame, crossmembers, tongue, and hinge are designed, see dump trailer frame construction. For hoist mount designs, see scissor hoist vs. telescopic vs. dual-ram.
MIG vs. flux core (and why the welder matters more)
Most trailers are welded with one of two wire-feed processes.
MIG (GMAW)
MIG welding, formally gas metal arc welding (GMAW), feeds a solid wire through a gun while a shielding gas protects the molten weld. MIG can run in different transfer modes:
- Short-circuit transfer runs cool. It's good for thin sheet and out-of-position welding, but it's prone to cold lap and lack of fusion on thick steel. Lincoln Electric's GMAW guide puts its usable thickness range at about 0.024 to 0.20 in. AWS D1.1 doesn't prequalify short-circuit MIG procedures; a shop has to qualify them by testing.
- Spray transfer runs much hotter, fuses thick steel well, and is mostly used in the flat and horizontal positions.
- Pulsed modes fall in between.
Flux core (FCAW)
Flux-cored arc welding (FCAW) uses a tubular wire filled with flux. Some versions also use shielding gas, and self-shielded versions don't need any. Flux core puts more heat into the joint, penetrates thick steel well, and works in all positions. It was developed largely for structural steel. The trade-off is slag, a crust over the weld that has to be fully removed before painting. Slag left under a coating causes it to fail early. See powder coat vs. paint vs. galvanized for why surface prep matters so much.
What matters more than the process
Either process can make excellent trailer welds. Problems come from mismatches: low-heat short-circuit MIG on heavy frame members, flux core with slag left behind, or any process run by someone rushing. When you talk to a builder, the useful question isn't "MIG or flux core?" It's "What process and procedure do you use on the main frame, and how do you know your welds are fused?"
AWS D1.1, certified welders, and what to ask
AWS D1.1 as a yardstick
AWS D1.1, Structural Welding Code — Steel, published by the American Welding Society, is the main U.S. code for welding structural steel. The current edition is 2025. It covers carbon and low-alloy steel 1/8 in and thicker, which includes trailer frame members. A companion code, AWS D1.3, covers thinner sheet steel.
Trailer builders aren't required to follow D1.1. But its visual inspection criteria (Table 8.1 in the current edition) make a clear, public benchmark:
- Cracks: none, regardless of size or location.
- Fusion: complete between weld and base metal and between weld layers.
- Craters: filled to full weld size, except at the ends of intermittent fillet welds outside their effective length.
- Undercut: no more than 1/32 in deep on steel under 1 in thick for statically loaded work, with limited exceptions and tighter limits for cyclically loaded primary members.
- Porosity: limited, and none allowed in certain full-penetration welds.
D1.1 also requires written welding procedure specifications (WPSs), the recipes that set process, wire, gas, settings, and technique for each type of joint, and welders who are qualified by test to use them.
Certified welders vs. certified inspectors
- An AWS Certified Welder has passed a hands-on test: a weld made to a specific code, process, position, and material, then inspected and tested. Certification applies to what was tested. A welder certified on flat plate isn't automatically certified for overhead work.
- An AWS Certified Welding Inspector (CWI) has met education and experience requirements and passed a multi-part exam on welding processes, codes, and inspection. A CWI judges whether someone else's welds meet the code.
Questions to ask a trailer builder
- Do you have written welding procedures for the frame, tongue, hinge, and hoist mounts?
- Are your welders qualified or certified, and to what code, process, and position?
- Who inspects welds, and is anyone on staff a CWI?
- Which welds are robotic and which are by hand?
- Are structural joints welded continuously? Where do you use stitch welds, and why?
- What process do you use on the main frame?
A builder who takes welding seriously will have quick, specific answers. Vague answers aren't proof of bad welds, but they're worth weighing.
Robotic vs. hand welds
More trailer builders use welding robots, especially for frames. Felling Trailers, for example, says its gantry robot welds trailers to the frame level, including crossmembers, frame rails, headboard, and tailboard, about 30% faster than manual welding.
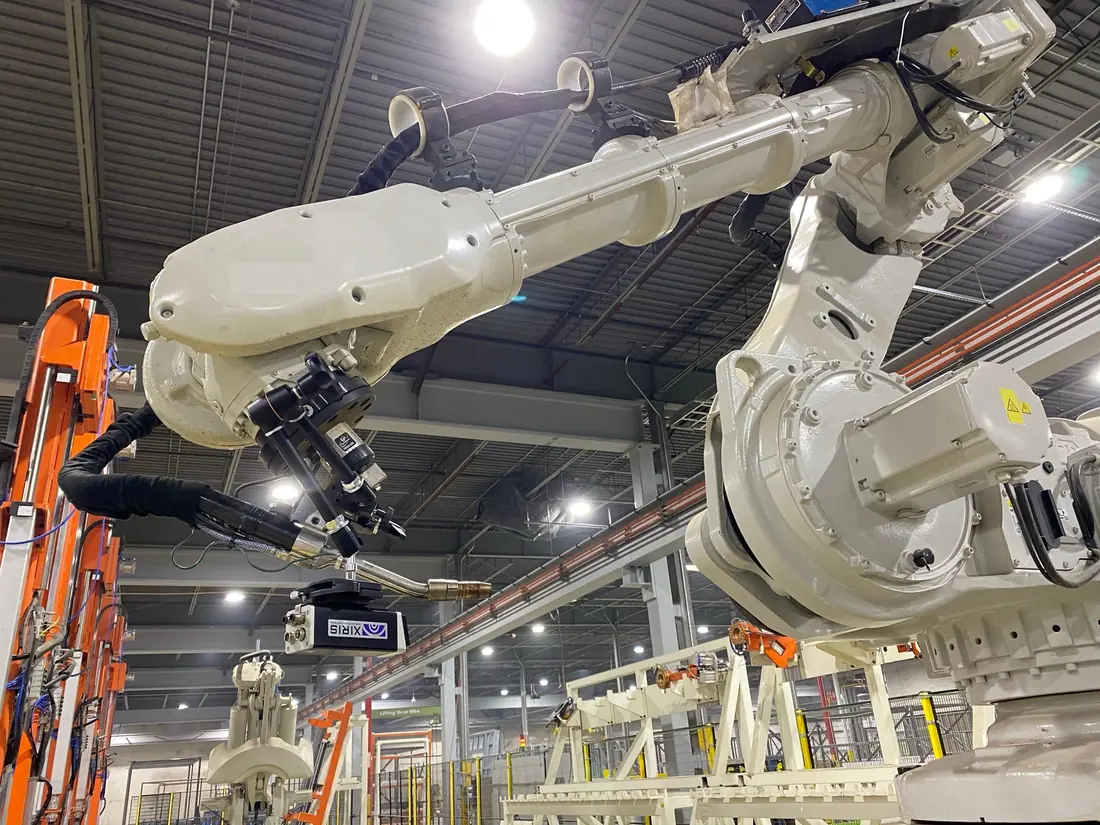

What robots do well: they lay the same bead with the same settings at the same speed every time, with no fatigue at the end of a shift and no hard-to-reach positions.
What robots don't do: adapt. A robot follows its program exactly, so if parts are cut or fit up poorly, it welds the gap the same way it would weld a tight joint. A bad program repeats its mistake on every trailer. Robotic welding depends on precise cutting, fixturing, and programming.
What hand welders do well: a skilled welder adjusts to each joint, handles one-off assemblies, and reaches places a robot can't. The weakness is consistency. Quality varies with skill, fatigue, position, and time pressure.
Most production trailers combine both: robot-welded frames and hand-welded assemblies like gates, toolboxes, and attachments. Robot welds are easy to spot because they look identical from joint to joint. Neither method is automatically better. Consistent fit-up, a proven procedure, and real inspection matter more than who or what holds the gun.
How to inspect welds at the dealer lot
Bring a good flashlight and, if you have one, an inspection mirror. Then work through the trailer in order.
- Start at the tongue. Get low and look at where the tongue meets the main frame, top and bottom. Look for full welds on both sides, gussets, and no cracks or rust lines in the coating.
- Check the coupler and jack mounts. Look for full welds and no distortion around them.
- Go under the frame. Pick several crossmembers and look where each meets the rail. Is it welded on every side you can see, or only tacked? Do welds wrap around the corners?
- Check the spring hangers. They should be welded all the way around, ideally with reinforcement at the frame.
- Look at the rear hinge. Check the welds on both the frame side and the bed side of each hinge plate.
- Raise the bed and inspect the hoist mounts, with the bed's safety prop engaged. Look at both the base mount on the main frame and the upper mount on the bed.
- Compare left to right. Consistent welds on both sides of the trailer suggest a consistent process. Big differences suggest the quality depends on who welded which side.
- Read the coating. Fine cracks or rust streaks running from a weld often mark a crack underneath. On a new trailer, bubbling or flaking along welds can point to slag or poor prep.
Inspecting a used trailer
On a used trailer, you're looking for welds that have already started to fail. Rust streaks from a weld, cracked paint in a straight line along a toe, fresh welds or added plates (signs of a past repair), and any movement in a joint when someone rocks the trailer are all reasons to look harder. Our used dump trailer inspection checklist covers the rest of the trailer.
The bottom line
Good welds are consistent, smooth at the edges, fully fused, filled at the ends, and continuous on structural joints. Cracks, undercut, porosity, and cold lap are the defects that matter, and AWS D1.1 gives a clear public standard for judging them. Focus your inspection on the tongue junction, crossmember joints, hinge, hoist mounts, and spring hangers. Ask the builder about procedures, welder qualifications, and inspection. A trailer with sloppy welds will cost more over its life, as we explain in why cheap dump trailers cost more.
Frequently asked questions
Are stitch welds bad on a trailer?
Not always. Stitch welds can be fine on thin sheet where heat distortion is a concern, like a floor sheet to bed crossmembers. On structural joints like crossmember-to-rail, the tongue, hinge, and hoist mounts, you want continuous welds, because every stitch end is a place for cracks and rust to start.
What does a bad weld look like?
Common signs are a groove melted along the edge of the weld (undercut), pinholes (porosity), a bead that sits on top of the steel with rolled edges (cold lap), uneven width and height, unfilled dimples at the ends, and any crack at all.
Is MIG or flux core better for trailer welding?
Both can make excellent trailer welds in the right hands. Flux core and spray-transfer MIG put more heat into thick frame steel. Low-heat short-circuit MIG is good for thin sheet but prone to cold lap on thick sections, which is why AWS D1.1 doesn't prequalify it.
Do trailer manufacturers have to use certified welders?
No federal rule requires it. Some builders qualify their welders to AWS D1.1 or similar standards anyway. Ask the builder what process, position, and thickness their welders are certified to, and who inspects the welds.
Can paint or powder coat hide bad welds?
It can hide spatter and small pinholes, and grinding plus coating can hide a lot. Cracks usually still show up as a fine line or rust streak in the coating over time, which is one of the best things to look for on a used trailer.
Share this guide
Link to this guide
Writing about dump trailers? You're welcome to quote this guide and link to it. Copy whichever format you need.
- URL
- https://stranktrailers.com/guides/dump-trailer-welding-quality
- HTML link
- <a href="https://stranktrailers.com/guides/dump-trailer-welding-quality">How to Judge Weld Quality on a Trailer</a> (Strank Trailers)
- Citation
- Strank Trailers. "How to Judge Weld Quality on a Trailer." stranktrailers.com, October 28, 2026. https://stranktrailers.com/guides/dump-trailer-welding-quality
Keep reading
Specs · 11 min read
Dump Trailer Frames: I-Beam, Channel, Tube, and Crossmembers
How dump trailer frames are built: I-beam vs. channel vs. tube rails, beam size and weight per foot, crossmember spacing, tongue design, and rear hinges.
Specs · 9 min read
Scissor Hoist vs. Telescopic vs. Dual-Ram Dump Trailers
Scissor hoist vs. telescopic vs. dual-ram dump trailers: how each works, dump angle, lifting capacity, stability, maintenance, cost, and which fits your loads.
Specs · 9 min read
Powder Coat vs. Paint vs. Galvanized
Powder coat vs. paint vs. galvanized dump trailers: how each finish is applied, why surface prep matters most, where rust starts first, and what road salt does.